Cloud Platform

How to build a mobile app with an App Engine backend (Tutorial)

Overview

This tutorial describes how to develop a mobile application powered by Google Cloud Platform. The application includes an Android client and an App Engine backend.

The example app is called the Mobile Shopping Assistant. The app lets users get information on products at the store they are in, as well as find nearby stores.

You will write custom code to wire the basic Android app client to the App Engine cloud backend, using Google cloud endpoints, so it can determine user location, locate nearby stores, and allow the user to obtain relevant offers and recommendations.

The following figure shows the main components of such application. Notice that the example in this tutorial only applies to the Android platform.
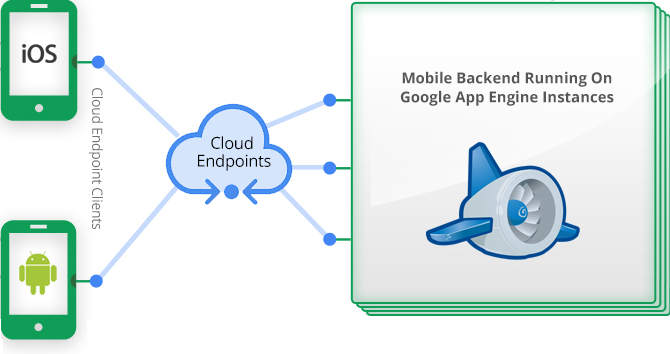
Figure 1 Mobile Assistant Components

Target Audience

This tutorial is directed to any developer interested in learning how to build services in the cloud and use them from mobile applications which give to the customers a more engaging environment and better experience.

You need to know how to program in Java and use Eclipse. Also, you should be familiar with building Android mobile apps. A basic knowledge of App Engine technology is not required but is a plus.

Tools and Packages Required

Make sure you have installed the following tools and packages for the tutorial:

Eclipse

  • Eclipse version 3.8 or higher. Install the tool from here.

App Engine

  • Google Plugin for Eclipse. You can download the necessary plugin here. Note that if you install the GPE includes you do not have to install the App Engine SDK s eparately.

Android

  • Android Development Tools (ADT). Install the Android tools (plugin) for the Eclipse IDE by following the steps described here: Installing the Eclipse Plugin.

    From within Eclipse, open the Android SDK manager to install the latest SDK platform tools. It is recommended that you install the latest Google API. The example shown in this tutorial were verified using API level 17.

Phase 1: Setup Mobile Assistant Application

In this phase you’ll learn how to set the development environment to build the mobile application. You’ll also learn how to allow the client to communicate with the mobile backend.

The application will contain the following projects:

  • MobileAssistant. This is the Android client that provides the UI. I n the background, the client interacts with the App Engine to gather stored information requested by the customer.
  • MobileAssistant-AppEngine. This is the backend project which provides the service in the cloud.

By following the steps described in this section, you will create an Android project with a n App Engine backend. The Android client will be able to call the backend.

As you progress, the tutorial will show you how to test what you have built up to that point.

Download Sample Code

Download the code from the MobileAssistant-Tutorial folder in Mobile Shopping Assistant. The archive contains phase 1 and phase 2 snippets that you need for the tutorial. It also contains a basic project that you might use as a reference.

Setup Android Development Environment

If you already know how to setup an Android development environment and create an Android client application project, you can skip to Setup App Engine Backend Application Project after you c reate a client application project called MobileAssistant.

  1. After you have downloaded the SDK, follow the instructions described in: Setting Up an Existing IDE. Remember that the tutorial assumes that you have already installed Eclipse.
  2. To develop Android applications, you also need to download at least one Android platform and the latest SDK Platform-tools. Follow the steps described in:Adding Platforms and Packages.
  3. In the Eclipse toolbar menu, click Help.
  4. In the drop-down menu, click Install New Software. The Install wizard is displayed.
  5. In the Work with: box enter
    Google Update Site for Eclipse 4.2 - http://dl.google.com/eclipse/plugin/4.2
    Notice that the version of the plugin depends on the version of your Eclipseinstallation.
  6. Read and accept the license agreement and click Finish.
  7. Click Next.

Create Android Client Application Project

This section shows you how to create a mobile client application project. The application provides the interface which allows the customer to interact with the backend, for example to obtain sales information.
  1. In Eclipse, click File then select New.
  2. Click Android Application Project.
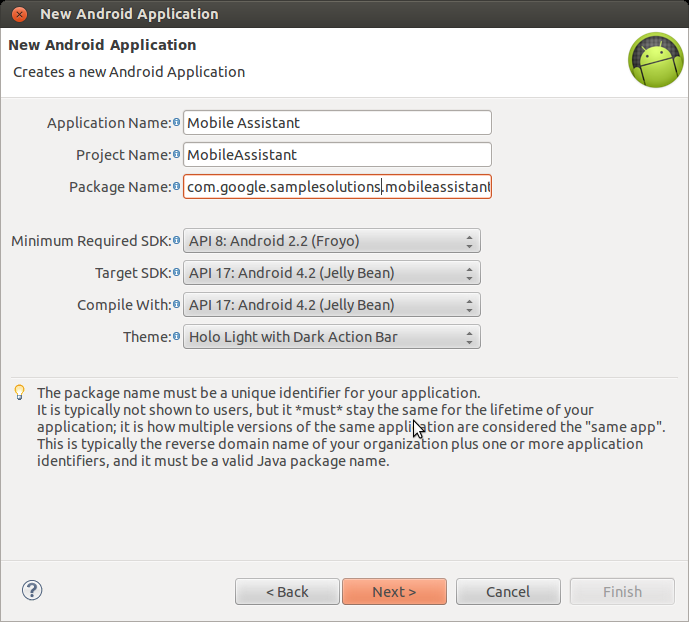
  3. The New Android Application wizard window is displayed.
  4. In the Application Name box, enter the name of your application, for example MobileAssistant.
  5. In the Package Name box, enter the name of your application’s package, for example com.google.samplesolutions.mobileassistant.
  6. In the Target SDK drop-down list box, select the API version you want to use. In the example this value is: API 17: Android 4.2.
  7. In the Compile With drop-down list box, select the same API version you used in the previous step.
  8. In the Theme drop-down list box, select a theme that is supported by the API version you chose in the previous steps. You can accept the default value.
Figure 2 Android Application wizard
  1. Click Next.
  2. In the next window that is displayed, accept the default values and click Next. The Configure Launcher Icon wizard window is displayed.
  3. Make the icon selections or accept the default values, click Next. The Create Activity wizard window is displayed.
  4. In the activity list box, select BlankActivity.
  5. Click Next. The New Blank Activity wizard window is displayed.
  6. If prompted, install the dependencies. Accept the default values and click Next.
  7. Click Finish.

    The MobileAssistant project is created. The project contains several generated classes that belong to the com.google.samplesolutions.mobileassistant package.

Setup App Engine Backend Application Project

This section shows you how to set up the project to create the mobile backend application which runs on Google Cloud Platform (App Engine). The application contains the data repository and the business logic to support the mobile client requests.

  1. In the Package Explorer, right-click on the project name MobileAssistant.
  2. In the drop-down menu, click Google.
  3. In the side menu click Generate App Engine Backend...
    In the displayed wizard, y ou can skip the steps for entering the Project Number and API key, unless you plan on using the generated sample code (described in the Creating App Engine Connected Android Project ).
  4. Click Create and let the operation finish. The MobileAssistant-AppEngine project is created along with an endpoint library in the client application. For more details about endpoints, see EndPoint Client Library Basics. The project contains several generated classes that belong to the com.google.samplesolutions.mobileassistant package.

So fa r you have created the environment for the development of the mobile assistant application, for both client and backend. In the next section you’ll start building the application and then test the communication between the mobile device and the App Engine cloud service.

Start Building the Application

In this section you will start building the application by creating a simple CheckIn entity class that allows the customer to check in a store, using her mobile device.

An entity class provides an “object-relational interface” between your application and the backend data repository.

After the customer checks in, the class insert s the store information in the backend datastore.

Now, let’s create the class in the MobileAssistant-Appengine backend application by following these steps :

Create an Entity Class

  1. In the Package Explorer, under the AppEngine project src folder, right-click the package, then select ->New->Class. The New Java Class wizard is displayed.
  2. In the Name: box enter CheckIn.
  3. Click Finish.
    For more information about the kind of class created, see the App Engine DataStore Overview.
  4. In the editor, replace the boiler plate code with the code for the CheckIn.java class that you can obtain from the snippets archive downloaded earlier. Notice that the code shown provides a “ready to run” class. The most important things you must pay attention to are the 3 properties and the annotations.
  5. Save the class.

Generate a Cloud Endpoints Class and Library

  1. Create the CheckInEndpoint.java class and related client library by following the steps described in: Entity Class Design Pattern. The following figure shows the entry for the client library in the MobileAssistant client project.
    Figure 3 CheckIn Endpoint Client Library

Open the class in the editor. Then, in the insertCheckIn method delete the following lines:

if (containsCheckIn(checkin)) {
throw new EntityExistsException("Object already exists");
}

This is because the CheckIn class is configured to use auto-generated key s. This is defined by the attribute @GeneratedValue(strategy = GenerationType.IDENTITY).

Using the endpoint design pattern and with minimal custom code, you have created the infrastructure that allows the communication between the client and the backend.

Before going forward, you’ll test the current minimal code and verify that the client and backend applications can communicate.

Modify the Client Application

In this section you’ll add some code to the MainActivity class to test if the client communicates with the backend. The code contains a CheckInTask class. At power-up this class sends a fictitious store ID to the backend endpoint to indicate that the customer has checked in.

Follow these steps to add the code:

  1. In the Package Explorer, in the MobileAssistant project, expand the MainActivity.java file.
  2. In the editor, open the MainActivity class.
  3. Replace the boiler plate code with the code find in the MainActivity.01.java file that you can obtain from the snippets archive downloaded earlier.
  4. Save the class.

This code sets the store ID to the arbitrary value StoreNo123. This ID is assigned to the CheckIn variable setPlaceId that will be stored in the App Engine datastore. You will see this value displayed in the Datastore viewer during testing described in the next section.

Test Client and Backend Communication

The goal of this test is to verify that the code written so far is working and that the infrastructure is in place so the client and backend can communicate. Specifically, you must verify that the fictitious store ID sent by the client is stored in the App Engine datastore.

The following snippet, from the Android MainActivity.java class, shows the code that calls the backend:

Checkinendpoint.Builder builder = new Checkinendpoint.Builder(
AndroidHttp.newCompatibleTransport(), new JacksonFactory(), null);
Checkinendpoint endpoint = builder.build();
….......
endpoint.checkInEndpoint().insertCheckIn(checkin).execute();

Note. This test runs on your local development server, so you first must start the backend and then the client application.

  1. In the Package Explorer, in the MobileAssistant project, expand the CloudEndPointUtils.java class.
  2. In the editor, open the CloudEndPointUtils and set LOCAL_ANDROID_RUN = true as shown next.

    This indicates that the MobileAssistant client application connects to the local d evelopment server.

  3. In the Package Explorer, right-click on the MobileAssistant-AppEngine project.
  4. Select Debug As ->Web Application.
    The application MobileAssistant-AppEngine starts on the local server.
  5. In the Package Explorer, right-click on MobileAssistant project.
  6. In the drop-down menu, select Debug As.
  7. In the side menu click Android Application.

    This starts the MobileAssistant client Android application simulation. The application will communicate with the backend MobileAssistant-Appengine.

    If you have not selected a device for the emulation, you ’ ll be asked to do so now. Follow the steps indicated by the wizard. The model 4.0”WVGA (480x800:hdpi) was selected for the example in this tutorial.

    If you get errors with 'R' being undefined and this is the first time you've tried to compile the project, it's likely that you've incorrectly installed the SDK.

    If you receive this error on subsequent builds, try deleting "R.java" (a generated class) and see whether you can regenerate it successfully. If this step fails, some error exists in the files of the "res" (resources) directory. Look for Eclipse warnings particularly in the XML files.

    To complete the test, you must verify that the store ID is stored in the App Engine datastore by performing the following steps:
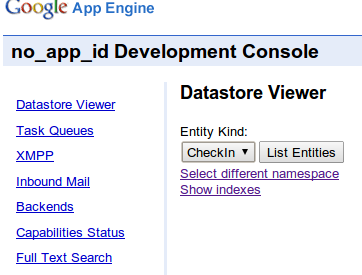
  8. In the browser of your development server, enter the following URL http://localhost:8888/_ah/admin. You will get a display similar to the following:
    Figure 4 Datastore viewer
  9. Click List Entities. This displays the CheckIn entity instance that contains the fictitious store ID. You should look for an entity with placeid = StoreNo123, as shown in the following figure. T his proves that the client communicates with the backend.
    Figure 5 CheckIn entity list

    With this, you have completed the preliminary steps in creating the mobile a pplication infrastructure.

    In the next steps, you ’ ll add logic to the backend that allows the customer to obtain information about places (stores) contained in the backend data repository.

Obtain Store Information

This section shows how to add more logic to the application to allow the customer to obtain information about stores contained in the backend repository. To achieve this goal, you must add a new entity class to the MobileAssistant-Appengine backend application called Place. In a real world application the information would be about places near to the customer’s location obtained in real time through GPS. The example uses simulated information contained in the App Engine datastore. Refer to the test section shown later to see how to populate the datastore.

  1. In the Package Explorer, under the MobileAssistant-AppEngine project in the src folder, right-click the package, then select ->New->Class.
    The New Java Class wizard is displayed.
  2. In the Name: box enter Place.
  3. Click Finish.
  4. In the editor, replace the boiler plate code with the code contained in the file Place.java that you can obtain from the snippets archive downloaded earlier.
  5. Save the class.
  6. Create the PlaceEndpoint.java class and related client library by following the steps described in: Entity Class Design Pattern.

You have created the infrastructure that allows the client application to retrieve places information that is in the backend datastore.

Modify the Client Application

Let’s now modify the client application again. This will allow you to obtain information from the the backend and display it in your Android client application.

  1. In the Package Explorer, in the MobileAssistant project, expand the MainActivity.java file.
  2. In the editor, open the MainActivity class.
  3. Replace the existing code with the version in the file MainActivity.02.java that you can obtain from the snippets archive downloaded earlier.

In this new version of the code, t he global resultsList variable contains the information obtained from the backend.

The client application instantiates the ListOfPlacesAsyncRetriever class at the creation time and calls its execute method (in the onCreate method).

The class makes asynchronous Mobile Assistant API calls when the customer check into a place. In the example code, it retrieves places information from the backend.

You will see this information displayed in the Android client application.

Modify Activity_main.xml

  1. In the Package Explorer, in the MobileAssistant project, expand the res folder and then the layout folder.
  2. Open the Activity_main.xml file. A dd the line of code shown next (to modify the existing TextView). This assures that the information retrieved from the backend is displayed by the Android client. R efer to the next test section to learn more about the information to be retrieved.
<TextView
android:id="@+id/results"
.../>

This defines a single layout covering the whole screen (the width and height values are “match_parent”). Inside the layout there is a single “TextView” element. This text box is initialized with the string literal “@+id/results” which identifies the list of the stores.

The results identifier is used in the OnCreate routine as follows :

resultsList = (TextView) findViewById(R.id.results);

This allows access to the widget so you can set new content (the list of stores). Notice, you can open the Activity_main.xml file using the Android XML (visual) editor and you can assign the value @+id/results to the Id property.

Test Display of Store Information

The purpose of the test is to retrieve the list of places from the backend. The test is performed on local development server. Refer to the steps performed in the case of the CheckIn entity class to enable local testing. Before you can proceed with testing, you must populate the backend repository with data, as shown next.

Create Upload Script

This is the script that actually uploads the simulated information into the backend datastore.

For information about the bulkloader.yaml and more, refer to the App Engine documentation in: Uploading and Downloading Data. Also, you can find the bulkloader.yaml file and the test data here MobileAssistant-Data.

  1. Create a new directory and make it your current directory.
  2. In your editor, create a script file and call it upload_data.sh.
  3. Copy and paste the following code into the file.
    #!/bin/sh
    appcfg.py upload_data
    --config_file bulkloader.yaml --url=http://localhost:8888/remote_api --filename $1 --kind=$2 -e
    nobody@nowhere.com
    

    The previous script accepts two arguments separated by a blank space:

    ./upload_data.sh<data.csv> <class entity name>

    The first argument is the name of the csv file that contains the data you want to upload, The second is the name of the entity class to handle the data.

  4. Close and save the file. Notice that the script at this time is intended to be used on local server. It must be modified when the backend application is deployed to the cloud. For example, e-mail “nobody@nowhere.com ” will be changed to an actual e-mail address of the App Engine administrator before deployment.

Places Simulated Data

The simulated data is contained in the file places.csv that you downloaded earlier from the MobileAssistant-Data directory in Mobile Shopping Assistant.

The file contains the following comma separated fields:

  • name: <place’s name>
  • placeId: <number that identifies the place>
  • location: <place’s latitude and longitude coordinates (two values separated by a comma) >
  • key: <unique key associated with the place>
  • address: <the place’s address >

Modify Web.xml

To upload data to the datastore, reference the “remote API servlet” and associate it with a URL. You’ll define these mappings in the Web.xml file of the MobileAssistant-Appengine application, as shown next. The web server uses this configuration to identify the servlet to handle a given request.

Note. Notice, you might need to restart Eclipse. if you skip th e Web.xml modification you will get Error 404 Not Found.

<servlet>
<display-name>Remote API Servlet</display-name>
<servlet-name>RemoteApiServlet</servlet-name>
<servlet-class>com.google.apphosting.utils.remoteapi.RemoteApiServlet</servlet-class>
<load-on-startup>1</load-on-startup>
</servlet>
<servlet-mapping>
<servlet-name>RemoteApiServlet</servlet-name>
<url-pattern>/remote_api</url-pattern>
</servlet-mapping>

Upload Places Simulated Data

To upload the test data to the data store, run the script that uploads the data from your script directory.

Before you upload your data, make sure to start MobileAssistant-AppEngine as a Web Application (in Debug mode) in Eclipse.

  1. ./upload_data.sh <places.csv> Place
  2. At the password request, just press enter.

To ensure that the data has been uploaded in the datastore, perform the same steps you followed in the case of the Checkin class. Refer to Test Client and Backend Communication section from step 3 forward.

In the browser of your development machine, open the App Engine administration dashboard at: http://localhost:8888/_ah/admin,
  1. Select Place in the drop-down list a shown in the next figure.
  2. Click List Entities. This displays the places information you uploaded.

Display Store Information

  1. In the Package Explorer, in debug mode, first start the MobileAssistant-AppEngine as a Web application then the MobileAssistant-AppEngine as an Android application, as you did when testing the CheckIn class.
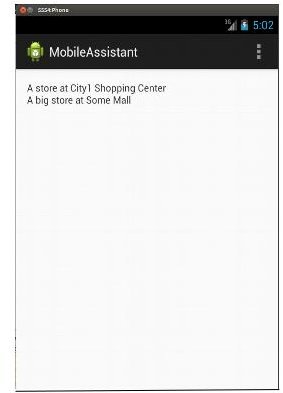
  2. Unlock the emulator to display the places information, as shown next.
    Figure 6 Android Emulator Display Store Information

Phase 2: Building the Business Logic

Now that the application infrastructure is in place, let’s proceed with the second phase of this tutorial. You ’ll add the logic that allows the customer to perform the actual tasks of checking in a place and obtaining relevant information such as sales that are in progress, offers, and so on.

Note. In this phase, the tutorial will describe the logic of key points without showing all the code involved. For that you can refer to the provided downloadable examples.

Create Client User Interface

This section shows the steps to add the user interface to the client application so the customer can interact with the backend.

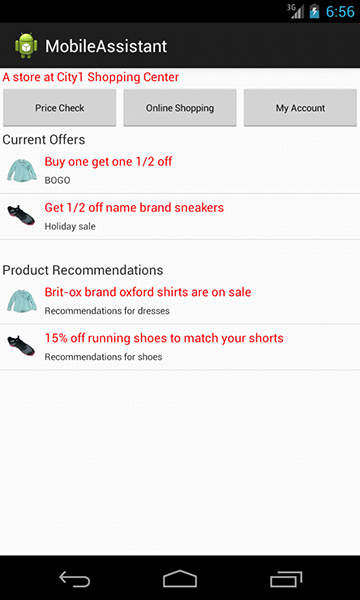
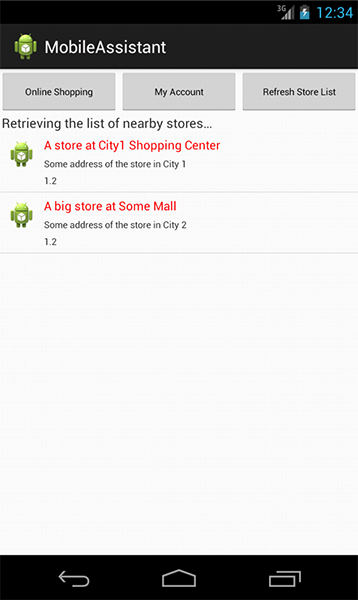
In order to build the UI you are going to add a few files to the MobileAssistant project and modify the MainActivity.java class as described next. The simple UI provides the following control buttons : Price Check, Online Shopping and My Account. The buttons are not yet functional in this phase.
  1. Modify MainActivity.java as follows:
    1. Replace t he TextView with a ListView which contains the list of the nearby places.
    2. In the onPostExecute method, instead of using a simple text output, use ListAdapter to display information with icons and better formatting on the Android device. For more information, see Android documentation.
    3. Add t he placesListClickListener event handler to process the customer ’s button click event. This event activates the logic that performs the check-in tasks.
      You will find the modified MainActivity.javaclass in the snippets archive downloaded earlier.
  2. Add the following new files you obtained from the snippets archive downloaded earlier:
    1. activity_main.xml. This file is in the res/layout folder and defines the UI layout for buttons, and places list.
    2. place_item.xml. This file is in the res/layout folder and contains information about display format and position for the places.
    3. strings.xml. This file is in the res/values folder and contains predefined strings to display on various occasions.
  3. After you have made the previous changes, recompile the MobileAssistant project.
  4. Run the backend if it is not running.
  5. Run the client (emulator). Refer to similar steps you followed in the previous section.
  6. Unlock the emulator (click on the lock icon and drag it to the right, outside the emulator image). This displays the UI and places information, as shown next. Notice that the buttons are not functional.
    Figure 7 Android Emulator UI and Places

Add Offers and Recommendations Logic to the Backend

In order for the application to do something meaningful you must add two more entity classes to the MobileAssistant-AppEngine application. The classes allow the customer to obtain information about offers and shopping recommendations.

The following are the classes you must add that you can obtain from the snippets archive downloaded earlier:

  1. Offer.java entity class. This class is responsible for gathering the offers available for each store.
  2. Follow the pattern as in the case of the Checkin.java class to create the related OfferEndpoint.java class.
  3. Recommendation.java entity class. This class is responsible for gathering shopping recommendations available.
  4. Create the related RecommendationsEndpoint.java class and the client library as you have done for the Offer.java entity class.

The classes you have just added rely on data information stored in the backend data repository. This means that you must populate the repository with meaningful data as shown in the test section later.

Add Offers and Recommendations Logic to the Client

This section describes the logic to be added to the client. This logic supports the display of offers and shopping recommendations. Moreover, the code adds formatting logic to properly display text and images applicable to the store selected by the customer.

  1. Modify MainActivity.java. R efer to the code for phase 2 downloaded earlier.
    1. Add the placesListClickListener event handler. This handler is invoked when the customer clicks on an item in the list of nearby places. It asynchronously checks the customer into the selected place and navigates to the activity that will present details about this place. Make sur e that t he following code is contained in the downloaded snippet :
      import android.view.View;
      import android.widget.AdapterView;
      import android.widget.AdapterView.OnItemClickListener;
      private OnItemClickListener placesListClickListener = new OnItemClickListener() {
      @Override
      public void onItemClick(AdapterView<?> arg0, View arg1, int arg2, long arg3) {
      Place selectedPlace = places.get((int) arg3);
      new CheckInTask().execute();
      }
      };
      

      In the onCreate method enter the following line to enlist the handler:

      placesList.setOnItemClickListener(placesListClickListener);
      
    2. To the placesListClickListener event handler you must add the logic that starts the collection of offers and recommendations for the store selected by the customer. Perform these steps: :
      1. Add the following to the import list:

        import android.content.Intent;

      2. In the placesListClickListener event handler and in the public void onItemClick(....) function, after the new CheckInTask().execute() ; statement, add the following code:
        PlaceDetailsActivity.currentPlace = selectedPlace;
        Intenti = newIntent(MainActivity.this, PlaceDetailsActivity.class);
        startActivity(i);
        
  2. Modify AndroidManifest.xml.
    1. Add the configuration <activity> entry for the PlaceDetailsActivity as shown next:
      <activity android:name=
      "com.google.samplesolutions.mobileassistant.PlaceDetailsActivity" >
      </activity>
      
  3. Add the following new files that you can obtain from the snippets archive downloaded earlier:
    1. offer_item.xml. This file is in the res/layout folder and contains information about the display layout for the offer information.
    2. activity_single_place.xml. This file is in the res/layout folder and contains information about the display layout for recommendation information.
    3. ImageUriViewBinder.java. This class handles store related images to be displayed.
    4. PlaceDetailsActivity.java. This class performs tasks such as retrieving offers and recommendations asynchronously. You can find the class in the snippets archive downloaded earlier. The class asynchronously retrieves the list of offers and recommendations through the appropriate endpoints and update the corresponding ListView and label for each. Make sure that t he following code snippet for the offer collection is contained in the downloaded snippet:
      import com.google.api.client.extensions.android.http.AndroidHttp;
      import com.google.api.client.json.jackson2.JacksonFactory;
      import java.io.IOException;
      import com.google.samplesolutions.mobileassistant.offerendpoint.Offerendpoint;
      
      /**
      * Retrieves the list of offers through appropriate CloudEndpoint.
      * @param params the place for which to retrieve offers.
      * @return collection of retrieved offers.
      */
      @Override
      protected CollectionResponseOffer doInBackground(Place... params) {
      Offerendpoint.Builder endpointBuilder = new Offerendpoint.Builder(AndroidHttp.newCompatibleTransport(), new JacksonFactory(), null);
      endpointBuilder = CloudEndpointUtils.updateBuilder(endpointBuilder);
      CollectionResponseOffer result;
      Offerendpoint endpoint = endpointBuilder.build();
      try {
      result = endpoint.listOffer().execute();
      } catch (IOException e){
      e.printStackTrace();
      result=null;
      }
      return result;
      }
      }
      

      Similar code applies to the recommendations collection.


Test Display of Offers and Recommendations

The purpose of the test is to retrieve the offers and the recommendations from the backend. The test is performed on local development server. Refer to the step performed in the case of CheckIn entity class to enable local testing.

Before, you can proceed with testing, you must populate the backend repository with data, as shown next.

Offers and Recommendations Simulated Data

In this section you are going to define test data following the same steps as in the ca se of the places simulated data.

The simulated data is contained in the fle offers.csv and recommendations.csv that you downloaded earlier from the MobileAssistant-Data directory in Mobile Shopping Assistant.

The offers.csv file contains the following comma separated fields:

  • description: <string that describes the offer>
  • key: <unique key associated with the offer>
  • title: <the title associated with the offer>
  • imageUrl : <the URL of the image to be displayed >

The recommendations.csv file contains the following comma separated fields:

  • description: <string that describes the recommendation>
  • key: <unique key associated with the recommendation >
  • title: <the title associated with the offer>
  • imageUrl : <the URL of the image to be displayed >
  • expiration: <the recommendation expiration date>

Upload Offers and Recommendations Simulated Data

To upload the test data to the datastore, you are going to use the same script described in Create Upload Script and follow the same steps described in Upload Places Simulation Data. From your script directory, where the offers.csv and recommendations.csv files are, execute the following steps:

  1. ./upload_data.sh offers.csv Offer
  2. At the password request, just press enter.
    If there are no errors, you should get a successful transfer message.

Repeat the same steps for the recommendations data, as follows:

  1. ./upload_data.sh recommendations.csv Recommendation
  2. At the password request, just press enter.

If there are no errors, you should get a successful transfer message.

To assure that the test data has been uploaded in the datastore, perform the following steps:
  1. In Package Explorer, right-click on MobileAssistant-AppEngine server application.
  2. In the drop-down menu, select Debug As.
  3. In the side menu click Web Application.
    The application MobileAssistant-AppEngine starts on the local server.
  4. In the browser of your development machine, enter the following URL http://localhost:8888/_ah/admin.
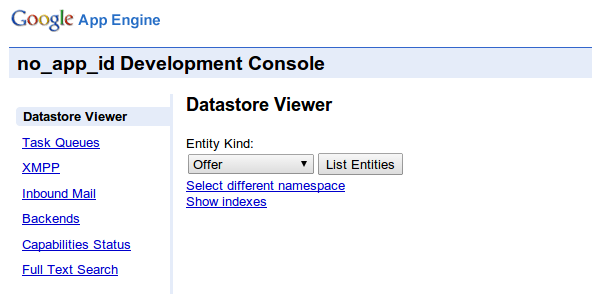
  5. Select Offer in the drop-down list as shown in the next figure.
    Figure 8 Offer entity class
  6. Click List Entities. This displays the offers information you uploaded, as shown in the following figure. This assures that the test data has been uploaded in the datastore.
    Figure 9 Offers information

Display Offers and Recommendations

  1. In the Package Explorer, in debug mode, first start the MobileAssistant-AppEngine as a Web application then the MobileAssistant as an Android application, as you did when testing the UI.
  2. Unlock the emulator (click on the lock icon and drag it to the right, outside the emulator image). You will get a display of the store information.
  3. Click on any store location. You should get the display of the offers and recommendations as shown in the next figure. Notice that at this stage of the implementation the information is the same for each store.
    Figure 10 Android Emulator Offers and Recommendations

Run Deployed Application

This section describes how to run the application using the MobileAssistant-AppEngine backend deployed in the cloud.

  1. Make sure that you have created your App Engine application to deploy the MobileAssistant-AppEngine backend. You create an App Engine application using the App Engine console. For more information, see administration console.
  2. In your test data directory, create a file named upload_data_deploy.sh. Copy and paste the following code into the file.
    #!/bin/sh
    appcfg.py upload_data --config_file bulkloader.yaml --url=http://yourappid.appspot.com/remote_api --filename $1 --kind=$2 -e your_email
    

    In yourappid.appspot.com replace yourappid with your App Engine application ID and replace your_email with the e-mail of the administrator for the application. You get this information from the App Engine console.

    The previous script accepts two arguments separated by a blank space:

    ./upload_data_deploy.sh<data.csv> <class entity name>

    The first argument is the name of the csv file that contains the data you want to upload, The second is the name of the entity class to handle the data.

  3. Save the file.
  4. In the Eclipse, in the MobileAssistant-AppEngine project, open the appengine-web.xml file and add your App Engine application ID as follows:

    <application>yourappid</application>

  5. Save the file.
  6. In the Package Explorer, right-click the MobileAssistant-AppEngine project.
  7. In the drop-down menu select select Google then, in the side menu, click Deploy to App Engine. If there are no error, you will get a successful deployment message in the Console window.
  8. Now we are ready to upload the data. Bring up a terminal window and switch to the directory where you have the test data and the upload script.
  9. Upload the three files: offers.csv, places.csv and recommendations.csv separately. The following shows how to do it for the offers data:

    ./upload_data_deploy.sh offers.csv Offer

    You might be asked to enter your account password. Run the script for the other two files.

  10. In the App Engine console, in the left panel, click the link DataStore Viewer and verify that the test data and entities are loaded.
  11. In Eclipse, in the MobileAssistant (client) project, open the file CloudEndPointUtils.java.
  12. Switch the LOCAL_ADROID_RUN variable to false. This specifies that the MobileAssistant-AppEngine backend is running remotely.
  13. Save the file.
  14. Finally, in the Package Explorer, right click the MobileAssistant project.
  15. In the drop-down menu select Run As then, in the side menu, click Android Application. If everything worked, you should be getting the same results described in the previous sections.

Conclusions

In this tutorial, you have created an app that allows users to “ shop smart ” by getting information on products they are looking for at the store they are in, as well as find stores nearby.

You used some custom code to wire a basic Android app to the App Engine cloud backend, using Google cloud endpoints, so it can determine customer location, locate nearby stores, and allow the customer to obtain relevant offers and recommendations.

The following are the highlights of the areas you must focus on to create your own application:

  • Establishing the connection between the Android client and the App Engine backend through the use of endpoints.
  • Creating the App Engine entity classes for the data you are interested in. In the tutorials you have seen this kind of classes, for example CheckIn, Places and so on.
  • Populating the App Engine backend datastore with the necessary data to associate with the entity classes.
  • Creating the client UI to allow the customer to retrieve the desired information from the backend datastore such as offers or purchase recommendations.

Y ou can use the example code in this tutorial as a starting point for your mobile application, powered by the App Engine cloud backend.

Additional Resources

If you need more information about the technology behind the tutorial, check out these resources.

Mobile Solutions

App Engine

  • Google Cloud Endpoints allow you to define business logic on App Engine and access it via RESTful or RPC APIs on multiple platforms including Android, IOS and JavaScript. For more information, see: Overview of Google Cloud Endpoints.
  • Getting started. Google App Engine lets you run web applications on Google's infrastructure. For beginner’s information, see: What is Google App Engine ?

Android

  1. Getting started. If you need introductory information, see Getting Started. You'll find instructions that describe how to accomplish a specific task with code samples you can reuse in your application.

Appendix

EndPoint Client Library Basics

Google Cloud Endpoints allow you to define business logic on App Engine and access them via RESTful APIs on multiple platforms including Android, IOS and JavaScript. Cloud Endpoints are built using Google’s API infrastructure. For more information, see Overview of Google Cloud Endpoints.

The Google Plugin for Eclipse (GPE), that you have installed when setting the development environment, allows you to create and consume Cloud Endpoints.

In particular, it allows the automatic generation of askeleton Endpoint class that contains code to create, get, list, update and delete your entity classes.

An entity class is a POJO (Plain Old Java Object) with JPA/JDO persistence annotations. This is an ordinary Java class that is marked (annotated) as having the ability to represent objects in the database.For more information, see Storing Data in the App Engine datastore. The class shown in the example is of a JPA type. Where

  • Java Data Objects (JDO) is a standard interface for storing objects containing data into a database. For more information, see the App Engine documentation Using JDO.
  • Java Persistence API (JPA) is a standard interface for storing objects containing data into a relational database. For more information, see the App Engine documentation Using JPA.

Entity Class Design Pattern

To create and use an entity class you must follow the following steps:

  1. In the Package Explorer, under the AppEngine project src folder, right-click the folder, then ->New->Class.
    The New Java Class wizard is displayed.
  2. In the Name: box enter the name of the class.
  3. Click Finish.
  4. In the editor, replace the boiler plate code with the actual code.
  5. Save the class.
  6. In the Package Explorer, right-click on the class just created.
  7. Select Google ->Generate Cloud Endpoint Class. The <classnameEndPoint.java> class is generated. Where the classname prefix is the name you assigned in step 2.
  8. In the Package Explore r, right-click on the App Engine project name.
  9. Select Google ->Generate Cloud Endpoint Client Library. The lib<classname>endpoint library is created in the mobile client.